

DIY off the shoulder dress with a Fouta towel
Although British summer seems to be long gone, I am still hoping that I would enjoy some Tunisian sun bathing when I’ll be there in September. I dug this fouta towel I bought four years ago and I wasn’t using much lately so I thought it would be nice to try making a dress out of it.

What you need:
— 1 regular fouta towel ( One size fits all from UK8 up to size UK14)
— 13mm wide elastic (for the length, measure your shoulder’s circumference and add 2cm)
— 1 Safety pin
— Sewing machine, thread, scissors, measuring tape, pins
Tips :
— Iron your fouta beforehand
— If you don’t have a sewing machine or you don’t want to bother stitching use a iron on hemming tape.
First step: Preparing the fabric
I chose to make a belt so I cut a 13cm wide band across the length. Allowing 1cm on each side for the seam.
For the ruffle I cut 2 rectangles of 25cm long from both fringed ends of the fouta.
You will end up having a large rectangle which will be the body of the dress. Cut this large piece in two equal smaller rectangles. These two are the front and back of the dress.

Second step: Cutting the armholes
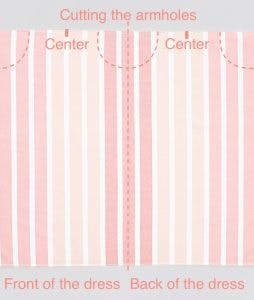
I used a tank top to draw the armholes curves on both top ends of both rectangles (front and back).
Cut the armholes and place a pin in the center of the fabric.
If you want, you can finish your seam with a baby hem or a biais. I rolled 1/2cm twice to make a baby hem.
Third step: Creating the dress
The belt: With right sides facing each other stitch 1cm away from the edge all along the belt. Then turn the fabric over (like a sock) This is a tricky part, you may need to use a stick.
The ruffle: sew the two rectangles 1cm away from the edge with right sides facing each other. This will form a large tube. Place a pin at the center of the tube.
The body: Same method.
Lay the ruffle piece on the body part of the dress with the center pins on top of each other, pin the ruffle and the body and sew them all together.
At this point you can already see the dress form. Don’t worry if it looks massive the elastic will make it right.

Fourth step: Incorporating the elastic
To create the tunnel where we will put the elastic, fold 1cm of the top edge of the dress and then fold again 2.5cm. Press and secure with pins.
Sew closely to the edge and leave a 5cm opening to insert the elastic.
Using a safety pin, insert the elastic through the opening and move it until it comes out. Stitch both ends of the elastic and close the opening.
And voilà! You have your dress ready for sunny days!
I hope you enjoyed this post. Let me know in the comment below if you would like to read more posts like this one.